
This week I spent a couple of afternoons underneath a green 'frog' van (see photo) that my partner's brother got given and offered to my partner for her son to drive until he can afford something better.
 The van its self is a 1989, Nissan, Vanette, ex-delivery vehicle. It had blown a head gasket and the owner didn't want the hassle of making the repair which, if done professionally, would have cost more than the van was worth.
My partner's brother and his backyard mechanic mate kindly offered to do the repairs which turned out to be a little more serious with the cylinder head having blown as well.
Now if you're not really an engine kind of person you're probably starting to scratch your head at words like 'gasket' and 'cylinder head'.
I'm not really an engine person either however I do know the 'broad strokes' of engine components and how they work. I learned most of what I know during my childhood years. Endlessly studying diagrams showing how various car components work so I could try and build scale model versions from my sizable Lego Technic collection.
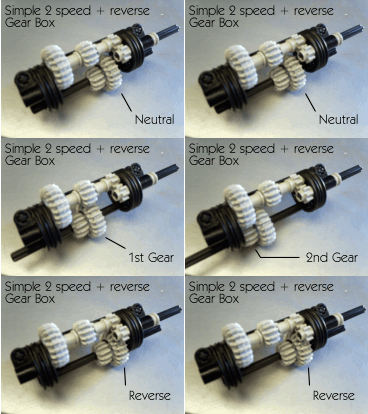 I'm still fascinated with that particular challenge and have a new, smaller Lego Technic collection that I tinker with from time to time. See the animated photo on the right of a simple two speed gearbox I recently made.
Sure the gearbox seems simple enough but trying to make things like this with only the pieces you have is quite a challenge. I don't have a very wide selection of gear wheels.
The rest of what I know about cars I learnt from watching and assisting other people fixing my first car or from my own stumblings around various car engines since.
I'm rubbish at trying to fix modern car engines with their fuel injection systems and computer controlled components but anything with a basic engine like those of cars built in the nineteen seventies I'm willing to have a go. That's how I ended up under the frog van. It has a basic four cylinder engine, nothing fancy.
Although the van had been fixed it developed a problematic leak in the cooling system that meant it would overheat if you tried to drive at any kind of decent speed. I volunteered to 'see what I could do'.
Any real mechanic could have probably fixed the problem in under thirty minutes. It turned out it was just the position of a hose clamp that wasn't properly sealing off the end of the hose. It was the location of that hose that was difficult. Right at the back of the engine. I couldn't get to it from above and from below it was quite awkward to reach.
It took me two afternoons to fix because, initially, I thought it was a blockage causing the pipe to leak. I couldn't see anything actually wrong with the pipe its self but it did have quite a severe kink that appeared like it could be enough to cause a blockage. However shortening the pipe and straightening it out made no difference.
Anyhow, to cut this long story short, this is how I learn about things. I'm not the kind of person who throws up their hands and says 'I don't know' until I've really had a good look and applied whatever experience I have already to the problem. I'll even have a look at something and see if I can learn how it works to try and fix it.
It doesn't work all the time but each time I succeed it gives me just a little bit more confidence in myself.
As far as I know the van is no longer overheating but it does make a wonderful backfire noise from time to time. I think I'll leave that problem for when the van goes in for a tune up and service.
 The van its self is a 1989, Nissan, Vanette, ex-delivery vehicle. It had blown a head gasket and the owner didn't want the hassle of making the repair which, if done professionally, would have cost more than the van was worth.
My partner's brother and his backyard mechanic mate kindly offered to do the repairs which turned out to be a little more serious with the cylinder head having blown as well.
Now if you're not really an engine kind of person you're probably starting to scratch your head at words like 'gasket' and 'cylinder head'.
I'm not really an engine person either however I do know the 'broad strokes' of engine components and how they work. I learned most of what I know during my childhood years. Endlessly studying diagrams showing how various car components work so I could try and build scale model versions from my sizable Lego Technic collection.
 I'm still fascinated with that particular challenge and have a new, smaller Lego Technic collection that I tinker with from time to time. See the animated photo on the right of a simple two speed gearbox I recently made.
Sure the gearbox seems simple enough but trying to make things like this with only the pieces you have is quite a challenge. I don't have a very wide selection of gear wheels.
The rest of what I know about cars I learnt from watching and assisting other people fixing my first car or from my own stumblings around various car engines since.
I'm rubbish at trying to fix modern car engines with their fuel injection systems and computer controlled components but anything with a basic engine like those of cars built in the nineteen seventies I'm willing to have a go. That's how I ended up under the frog van. It has a basic four cylinder engine, nothing fancy.
Although the van had been fixed it developed a problematic leak in the cooling system that meant it would overheat if you tried to drive at any kind of decent speed. I volunteered to 'see what I could do'.
Any real mechanic could have probably fixed the problem in under thirty minutes. It turned out it was just the position of a hose clamp that wasn't properly sealing off the end of the hose. It was the location of that hose that was difficult. Right at the back of the engine. I couldn't get to it from above and from below it was quite awkward to reach.
It took me two afternoons to fix because, initially, I thought it was a blockage causing the pipe to leak. I couldn't see anything actually wrong with the pipe its self but it did have quite a severe kink that appeared like it could be enough to cause a blockage. However shortening the pipe and straightening it out made no difference.
Anyhow, to cut this long story short, this is how I learn about things. I'm not the kind of person who throws up their hands and says 'I don't know' until I've really had a good look and applied whatever experience I have already to the problem. I'll even have a look at something and see if I can learn how it works to try and fix it.
It doesn't work all the time but each time I succeed it gives me just a little bit more confidence in myself.
As far as I know the van is no longer overheating but it does make a wonderful backfire noise from time to time. I think I'll leave that problem for when the van goes in for a tune up and service.


Comments
Post a Comment
Comments are moderated by an actual human (me, TET) and may not publish right away. I do read all comments and only reject those not directly related to the post or are spam/scams (I'm looking at you Illuminati recruiters... I mean scammers. Stop commenting on my Illuminati post!).